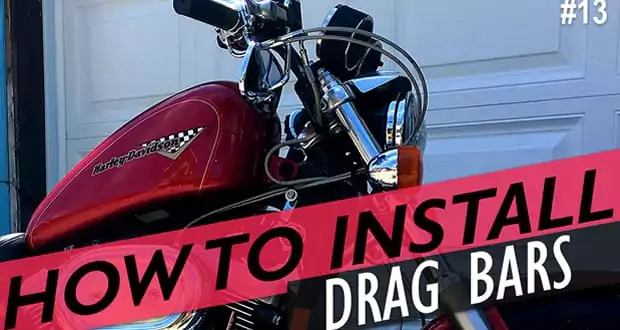
I decided it was time to create a How To Change Sportster Handlebars video. A quick and easy Harley Sportster handlebar replacement can dramatically change the look of your motorcycle, and paired with a 2″ tank lift and some new grips, this 1998 Harley-Davidson Sportster got a style refresh that made it look and feel a decade newer. She went from zero to hero, and not only was it easy, but it only cost $80!
This is essentially a handlebar replacement time-lapse with voiceover instructions that let you know what I’m doing and give you some tips along the way. I chose this format rather than a detailed step by step filming, to show viewers what they need to know in a relatively short video compared to others out there.
How to change your Harley-Davidson Sportster’s handlebars
Sportster handlebar change recommended products:
- Awesome Harley-Davidson Sportster Knurled + Dimpled Drag Bars
- Avon Grips (awesome quality/price + lifetime warranty!)
- Torx Wrench Set (need a T25 and T27)
- Standard Hex Keys (this set includes metrics as well)
- Magnetic Tray (nice to have)
- Lots of Braided Cable Lines for Sportsters (may be necessary depending on the bars you choose)
Handy resources for your handlebar change:
- CycleErgo (free tool for measuring the ergonomics of your motorcycle)
- Rubber vs. Steel Braided Brake Lines (article)
Videos:


Notes:
Before you begin your Sportster handlebar change / upgrade, there are a things to keep in mind:
- It’s a good idea to lay a towel or a rag over your gas tank and front fender to avoid any scratches.
- You will need Torx Wrenches, the set I’ve linked to is less than $10.
- You can use a cheap Magnetic Tray to avoid losing screws, it’s also less than $10.
- If you’re replacing your handlebars with Z-Bars or Apes, your current cables may not be long enough and you may need longer ones. If so, you should think about replacing them with Braided Cable Lines.
- If you’re replacing the handlebar on a Harley you’ll need to get a bar that is dimpled or drilled or your cables will not fit.
- A knurled handlebar has grooves that help it from sliding around, a nice to have, but not necessary.
- There are small little pieces inside your throttle that hook up to the cables that get lost easily. If you lose yours, they’re called ferrules and you can buy a ten pack of them here.
Sportster handlebar change instructions:
For those who can’t watch the video:
- Remove the current hand controls. Use the T25 and T27 from your set of Torx Wrenches.
- There are four torx screws in total: 2 x clamping to the handlebar, 1 x on top of the hand controls, 1 x underneath them.
- Use standard (american) hex keys to remove the clamp holding the handlebar in place and remove old bar.
- Install new bar and replace clamp and bolts.
- Follow the instructions on your grips, make sure you do not mix throttle and clutch side grips.
- Replace controls using your T25 and T27 Torx.
Sportster handlebar change conclusions
A new handlebar can refresh the look of even a 1998 Sportster and make it look a decade newer for only about $80! The work can easily be done at home with only some two torx wrenches and a hex key.
If you want to show your support for the tips, tricks, and info we put out, please Subscribe to our new YouTube channel here. If you want advice on what handlebar to get, shoot me an email and I’ll help you find the best fit for your bike.
Cycle-Ergo can help you understand how your new bar is going to affect your ergonomics on your bike.
Now that you’ve got your new bars on, here’s how to do an oil and filter change on a Harley-Davidson Sportster.
Hey – Would you know what would be the best drag bars to get for my 08 vstar 1100 classic? The ride set up is a bit squished for me and I love the look of dragbars. I am 6 feet tall.
Also, what other components would I need to make the switch?
Any input would be great – thanks!
Hey Paul, I wanted to answer this here so others with the same question might see it too. The truth is that a handlebar selection should be a personal choice. You should be the one to sit on your bike, put your hands out to wherever they feel most comfortable, and then pick a bar that’s gonna have the rise and pullback to get your body how you want it. People with the same height can have different torso lengths, different arm lengths, different back/hip strengths or ailments. I don’t want to mislead you just to sell a handlebar. A one size fits all answer would only fit the person answering the question. My advice is this:
1) Sit on your bike and put your hands out for where they naturally want to be ride the bike.
2) Take mental note, or have a friend measure, how far off the are from the stock handlebars.
3) Look for a handlebar with the right rise, width, and pull back to get your arms comfortable.
Bonus: Before you buy, you might want to punch that info into cycle-ergo.com to see how the change will effect your posture. Hope this helps!
Bought a 2004 Sportster XL1200R back in January 2022, and it came with those ‘Z’ bars that I can’t stand either. Ordered new handlebars off Amazon, along with some rear-view mirrors. By the way, the ones I got are supposed to be stock with a matte black finish. I’ve been riding since I was 9, but at 73 and away from bikes for about two decades, it’s a whole different ball game. Never really worked on them aside from basic stuff like oil changes and tune-ups. Any tips before I dive into this task? Just subscribed, gave a thumbs up, and hit that bell icon. Looking forward to more of your shows. Thanks for sharing with us. If anyone wants to chat, I’m all ears!
You’ll find a lot of how to videos on youtube, but they aren’t all created equal. You should watch 2-3 on any given topic, because you might find some better than others, and between watching a bunch of them, you should be able to have all your bases covered.
Handlebars on any Harley where the control wiring pass through the brake and clutch perch clamp, becomes a very difficult operation to accomplish correctly without damage to that wiring. First, the handlebars must be properly dimpled and second, the installer must assure that the wiring properly enters and exits the dimpled area and that the screws or the perch clamps do not at any time violate the wiring insulation.
This issue was cured with the later motorcycles where the wiring was pass through the handlebars. But for the dimple handlebar controls, it remains an issue for any one desiring to change their handlebars. Even with the best intentions and being most careful, its easy for the installer to damage the insulation on the wiring. This is not to say changing handlebars on these motorcycles cannot be done, its simply indicating that the job is not as simple as some assume and as some make it appear.
For this reason its best for the installer of new handlebars on those types of Harleys where the handlebar wiring passes into a dimple and through the brake and clutch perch, to pay careful attention during installation to assure the wiring in this area does not become pinched or its insulation damaged.
Do you need to take the controls all the way apart? or can you just loosen and slide them off. My 2014 883 superlow was knocked over last month (Feb 05 2023) in our apartment bulidings garage. Bike was ok (scuffed up the right side engine guard chrome a bit and cracked rear right blinker lens the small HD bags saved it from worse) I couldn’t get it inspected last week because the dealer says the bars are bent some and they have to be perfect. I ordered OEM exact type stock bars and grips like whats on it, but don’t want to pay the dealer $900 to install them.
I can’t see them being bent and the short ride to the dealer felt like it always had.
Thank you for your time.
Holly
Hey Holly, if you watch the video at the top of the article you can see how I do it. That should answer your questions.