Here’s how to test your motorcycle brake fluid yourself, so you can tell if your motorcycle brake fluid has gone bad. We’ll also look at why motorcycle brake fluid goes bad to begin with, and what bad brake fluid can mean for you and your motorcycle.
Brake fluid is one of the two most fluids in your motorcycle, and most manufacturers recommend replacing your brake fluid every two years. However, in my experience looking at dozens of people’s motorcycles every week, I can tell you that a lot of people are neglecting their brake fluid.
Considering how important proper brake performance is to motorcycle riding, you should make sure you test your brake fluid to see if it has gone bad at least once every year. Luckily, there are three easy ways to do that. The three ways we’ll be testing our motorcycle brake fluid are by feel, by sight, or with a tester. First let’s talk about how brake fluid goes bad in the first place.


Why does brake fluid go bad?
Most motorcycles use either DOT 3, DOT 4, or DOT 5 brake fluid. In other words, most motorcycles use a brake fluid that is hygroscopic. Hygroscopic is an adjective that describes something that will absorb moisture from right out of the air into your brake lines. That means even if you don’t use your vehicle, the brake fluid inside of it will absorb water from the humidity in the air. Even 2% to 3% water in your braking system can make a serious impact on your braking performance.
Why is old brake fluid a problem?
Your hygroscopic brake fluid absorbs water over time, and water has a much higher boiling limit than brake fluid. That means pure brake fluid performs very well as your brakes heat up, but brake fluid with water in it performs poorly as your brakes get hot. Under heaving breaking, your braking system could overheat, leading to brake fade, which is when your braking system gets so hot that it stops working when you need it the most.
Another problem with moisture getting into your brake fluid, is that by introducing moisture into your braking system you can start to create rust internally which can lead to failures that you can’t see coming.
What is brake fade?
Brake fade is the result of components in your braking system overheating under heavy braking. Bad brake fluid might not lead to brake fade in city traffic speeds, but it could lead to brake fade at highway speeds. You’ll be coming to a stop as you apply your brakes, and suddenly you’ll start traveling more quickly again, as your brakes have stopped performing properly.
Testing motorcycle brake fluid
Obviously, brakes are critical to motorcycle riding, so we want them to work. There are three ways to test your motorcycle brake fluid: by sight, by feel, and using a small tester device. We’ll go over all three in detail.
Testing motorcycle brake fluid by sight
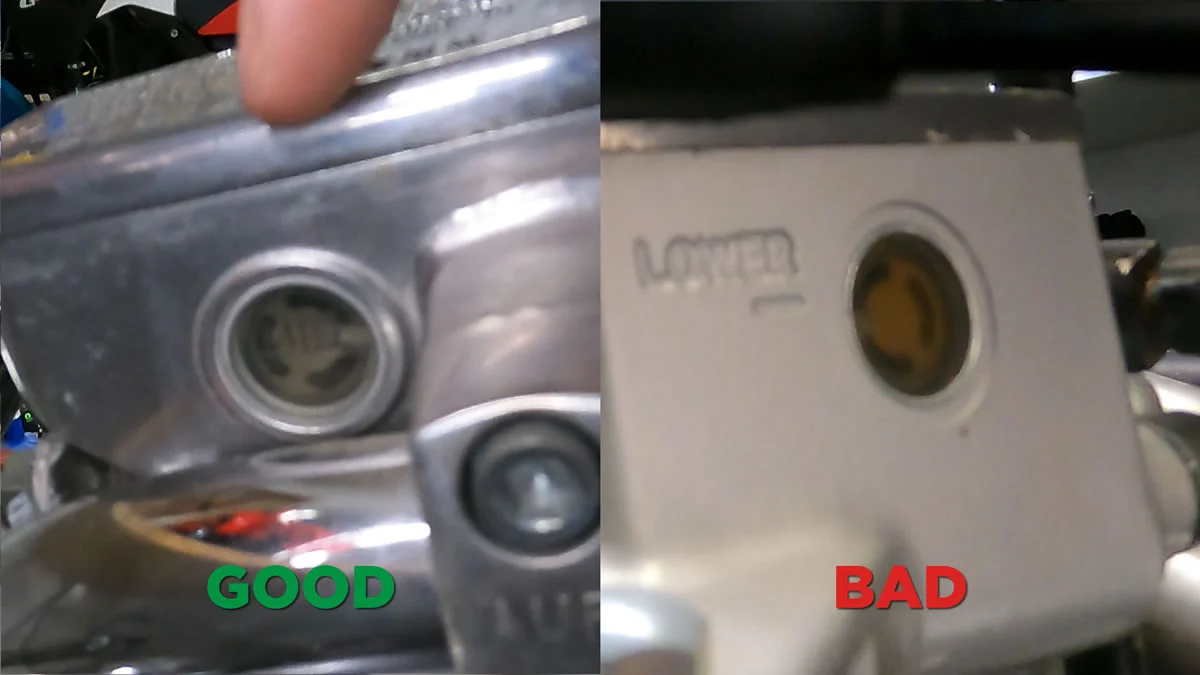
One symptom of brake fluid absorbing moisture is that brake fluid will go from looking like a very pale yellow color, to looking like whiskey (or darker). That’s why most motorcycle master cylinders (the reservoirs that hold your brake fluid) are either clear or semi-clear bottles, or they have a little sight glass, so you can look inside and see what color your brake fluid is.
You can tell whether or not your brake fluid has gone bad by looking at the color of the fluid. Is it light and clear, or does it look amber like a shot of whiskey, or even darker? Another way of knowing whether your motorcycle brake fluid is good or bad is by imagining you were giving a urine sample to a doctor: does the color look healthy, or does it look like you’re in dire need of some fresh fluids?
You can take a look at the video above to see a comparison of the color of new versus old brake fluid.
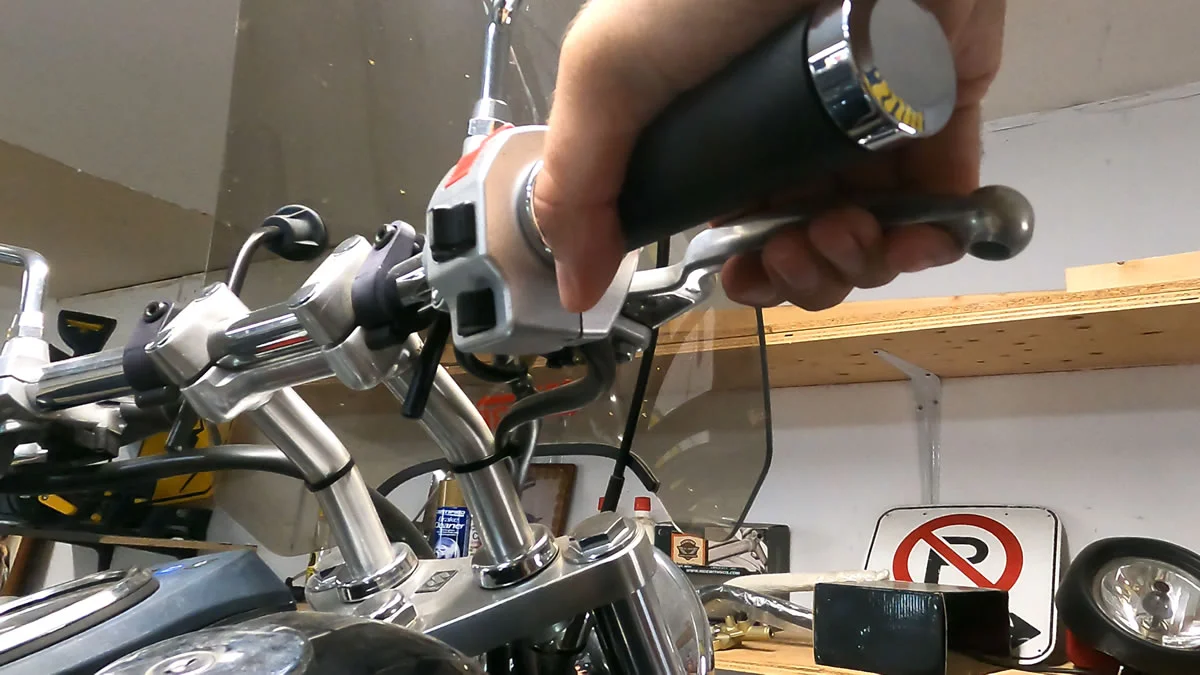
Testing motorcycle brake fluid by feel
Another symptom of your brake fluid having absorbed too much moisture is a spongy or squishy feel to your brake lever. When you squeeze your brake lever it should feel firm and crisp, not squishy. The right versus wrong feel for your brake lever should be like the difference between squeezing the glutes on an Olympic athlete versus squeezing granny fanny. Good brake fluid will make your lever feel firm and strong, bad brake fluid will feel flabby.
It’s difficult to describe the right and wrong feeling, but in the video above I go over showing you how the brake lever will react differently in a motorcycle with good brake fluid versus with bad brake fluid and the differences are easily seen on camera. Have a look if you’d like to learn more about testing motorcycle brake fluid by feel.
Testing motorcycle brake fluid by brake fluid tester
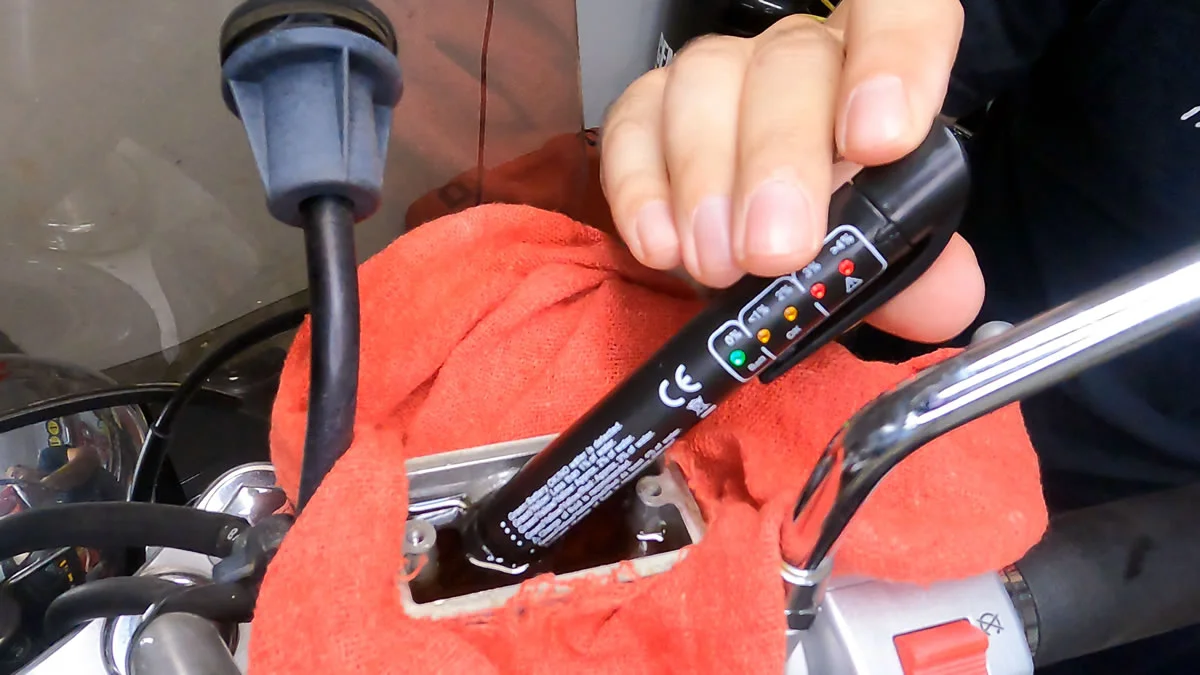
The last way to check your brake fluid is with an electronic brake fluid tester. You can pick these up for about $10 on Amazon. They read the moisture in your brake fluid and let you know if it’s time for replacement.
If you’re brand new to motorcycle maintenance and you aren’t confident in your experience you should consider buying a brake fluid tester to help you get started. To use it you simply put remove the brake fluid reservoir cap and diaphragm and stick the tester into your brake fluid. Lights on the side will indicate whether your brake fluid is GOOD (0% moisture), OK (1%-2% moisture, or BAD (3% moisture or more).
Be careful not to spill any DOT-4 brake fluid on your motorcycle while using the tester. DOT-4 brake fluid is highly corrosive and will damage the paint and finish of your motorcycle.
You can take a look at the video earlier in this article to see step by step instructions on how to use a brake fluid tester.
Final thoughts on how to check motorcycle brake fluid
For $10, a break fluid tester is a great tool for a first timer do-it-yourself’er who wants good peace of mind, however, it isn’t necessary. You can save yourself the money by just using the sight test (pee test) or the feel test (butt test). Of course, if it’s been more than two years, there’s no need to test your brake fluid, even if the motorcycle’s been sitting, it will still need fresh brake fluid.
However you decide to test your brake fluid, just make sure you do it. It’s a great practice whether it’s part of every day motorcycle maintenance, or part of restoring an old motorcycle.
If you found this content helpful, please consider subscribing to YouMotorcycle on YouTube and leaving a comment on the bottom of this page to let me know it helped you out. I always enjoy hearing from readers, it gives me the juice I need to keep making content to help motorcyclists. Thanks for your time in reading this. If you have any questions please let me know!
How do you change brake fluid?
You can change your motorcycle brake fluid yourself, a process called bleeding brakes, in these five steps:
- Remove the covers, lids, and diaphragms to access the master cylinder reservoirs
- Suck out old fluid with a siphon, syringe, or turkey baster
- Refill brake fluid reservoir with new DOT-4 brake fluid (verify your motorcycle uses DOT-4)
- Bleed the brakes (follow the process detailed here)
- Repeat the process on the other brake (front or rear)
You can also simply watch this video which will go over it:
Side note: A strobing brake light can help keep you safe
This cheap flashing LED brake light for motorcycles will keep you safe from rear end collisions on your next motorcycle ride!
Yet another concise and informative video. Mille grazie Adriano
May I suggest that you proof read your articles please?
The section “Under heaving breaking” should, I think, read “under heavy breaking”…
I think you mean “under heavy braking” ;)
Looks like we both made a typo… but mine was one in about 1500 words so I’m not tooooo bothered by it haha. The whole site is a one man project, so I can’t be perfect. Anyway, thank you for pointing this out, I will correct it ASAP!
Thank you for the article about brake fluid. I learned the hard way on a Harley Davidson striped down ElectraGlide back in the 70’s. Never heard anyone ever talking about changing brake fluid back then. Two lessons learned. Back then there were more leaky cars and oil and antifreeze in the center of the lanes. I’d been warned about that. My front brake had been grabbing sometimes so I thought I’d take it for a test drive (in a drizzle). I pulled up to a left turn lane and the front brake locked and the bike went down VERY fast. I was only going about 2 MPH when this happened. No damage to me or the bike. Took it home and opened the master cylinder. The aluminum piston was corroded. I cleaned it up and put it back together. No more grabby brakes
Happy to help and glad you survived what could have been much much worse!
My manual says to swap out the fluid once a year. Pro racers do it every 3 months. Over here in high humid weather, I change it every 6 months. Steel braided lines help keep water from seeping through the rubber hoses, and they give a firmer feel. Remember, good brakes save lives.
Just starting out on this riding journey, and man, this vid’s blown my mind. Had no clue I was cruising on bad brake fluid haha